Backing Up Docker Images to a USB Drive on Raspberry Pi / ARM Linux
Overview
This is a battle-tested workflow for exporting Docker images from a Raspberry Pi (or any ARM-based Linux box) to an exFAT-formatted USB drive, then loading them back on a fresh install or different machine. It avoids network pulls, preserves exact image tags and IDs, and sidesteps common permission headaches when dealing with auto-mounted removable media.
Tested on Raspberry Pi 4B running Raspberry Pi OS / Debian-based distro, but the commands are generic to any modern Linux with Docker.
Why This Matters
Docker images on embedded devices eat up space fast. TF cards and small SSDs fill quickly, and rebuilding everything from scratch over slow or unreliable internet is painful. A reliable offline backup lets you:
- Wipe/reinstall the OS without losing your container environment
- Migrate to new hardware quickly
- Keep a cold spare of critical images (e.g. transmission, cloudreve, custom builds)
Exporting Images to USB
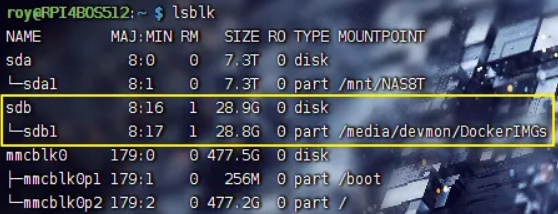
Plug in the USB drive and identify it.
- execute:
lsblk![]()
Look for something like /dev/sda1 or /dev/sdb1 with exFAT filesystem. Never guess — double-check size and label.
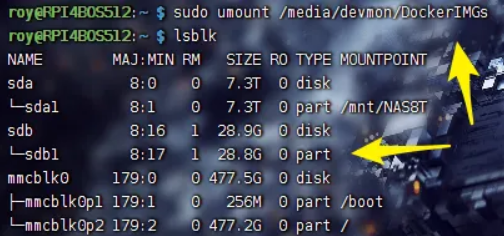
Unmount any auto-mount (devmon/udisks2 usually mounts to /media//
- execute:
sudo umount /media/devmon/DockerIMGs - adjust path to match your system
![]()
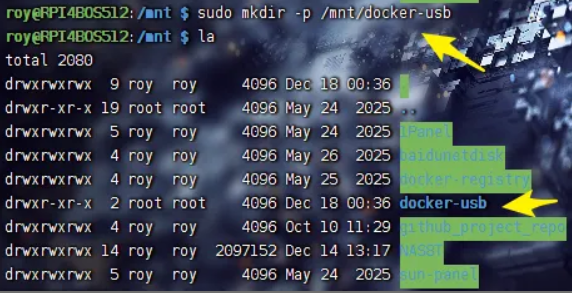
Create a clean mount point
- execute:
sudo mkdir -p /mnt/docker-usb![]()
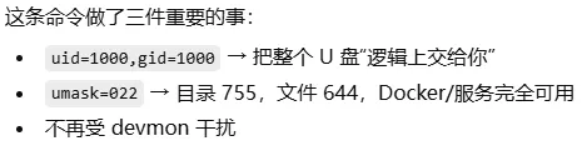
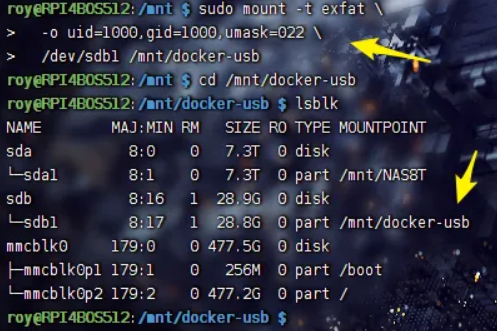
Mount the drive manually with proper ownership and permissions
This is the most important step — auto-mounts almost always give root:root or 1000:1000 with restrictive umask, making it annoying to write from non-root.
- execute:
1
2
3
sudo mount -t exfat \
-o uid=1000,gid=1000,umask=022 \
/dev/sdb1 /mnt/docker-usb uid=1000,gid=1000→ files appear owned by your regular userumask=022→ creates files as 644, directories as 755 (normal user-writable)![]()
![]()
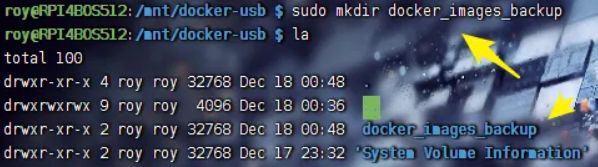
Create backup directory on the drive
- execute
1
2
3
cd /mnt/docker-usb
sudo mkdir docker_images_backup
sudo chown $USER:$USER docker_images_backup # optional but cleaner![]()
Export images
Use docker save to create a single .tar per image (or multi-image tar if you prefer).
Replace with your actual image:tag pairs.
1 | sudo docker save -o /mnt/docker-usb/docker_images_backup/transmission_latest.tar lscr.io/linuxserver/transmission:latest |

Run as your user if the mount is correctly owned; otherwise prefix with
sudo.
Verify sizes and integrity
- execute:
1
2ls -lh /mnt/docker-usb/docker_images_backup
du -sh /mnt/docker-usb/docker_images_backup/*![]()

Safely unmount
- execute:
1
2cd ~
sudo umount /mnt/docker-usbWait for the command to return, then physically remove the drive.
Restoring Images on a New / Reinstalled System
Plug in the USB drive.
It will probably auto-mount again (often to /media/
Locate the mount point and check contents
- execute:
1
2lsblk -f
ls -lh /mnt/docker-usb/docker_images_backup # adjust path
Load the images
- execute
1
sudo docker load -i /media/devmon/ImgBackU/docker_images_backup/openwrt-aarch64.tar
- You’ll see output like
Loaded image: buddyfly/openwrt-aarch64:latest
![]()

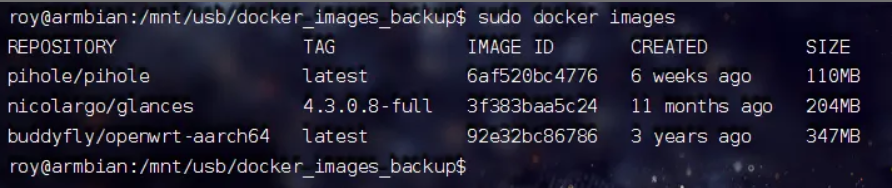
Verify everything came back intact
- execute:
sudo docker images - Check that repository:tag and IMAGE ID match exactly what you had before. If IDs match, layers were preserved perfectly.
![]()
(Optional) Unmount when done
- execute:
sudo umount /mnt/usb
- or wherever it mounted
Quick Tips & Gotchas
- Always use
docker save / docker load— never copy/var/lib/dockerdirectly. The latter is dangerous and usually breaks. - exFAT is ideal for cross-platform (Linux ↔ Windows/Mac) backups. If you only stay on Linux, ext4 works too but isn’t as portable.
- If
mount -t exfatfails → installexfatprogsorexfat-utils(sudo apt install exfatprogs). - Large images (>10–20 GB) take time to save/load — be patient and watch
iotoporhtopif curious. - For bulk export of all images:
1
docker images --format '{{.Repository}}:{{.Tag}}' | xargs -n1 docker save -o backup.tar
but single-file tar gets huge; per-image is usually better for manageability.
References
- Docker官方文档 - docker save
- Docker官方文档 - docker load
- Linux mount exFAT 文件系统(Explain the usage of uid/gid/umask parameters)
This workflow has survived multiple Pi reimages and migrations for me. Keep your USB drive in a safe place — it’s now your offline Docker lifeline.