Bookmarks I Actually Use (Stripped Down)
Overview
Over the years, I’ve accumulated hundreds of bookmarks. These are the ones I actually keep coming back to — stripped of the dead links, outdated tools, and fluff. Consider this my own backup, and hopefully a useful reference for fellow engineers.
Bookmarks
🌐 Network Diagnostics
| Site | Purpose |
|---|---|
| ip.net.coffee | Check current IP, geolocation, network connectivity and routing |
| ip111.cn | Comprehensive IP address query |
| ip.im | IPv4 information lookup |
| ipleak.net | WebRTC leak detection |
| browserleaks.com | WebRTC IP leak test & browser fingerprinting |
| whoer.net | Quick anonymous IP check |
| ipinfo.io | IP geolocation and ASN lookup with API access |
| whatismyipaddress.com | Public IP address detection |
| dnschecker.org | Global DNS propagation checker |
| web-check.xyz | All-in-one website analyzer: DNS, SSL, headers, WHOIS |
🌐 Network Speed Test
| Site | Purpose |
|---|---|
| cegesu.com | Internet speed test |
🔧 Development Tools
| Site | Purpose |
|---|---|
| GitHub | Code hosting & collaboration |
| Lighthouse Treemap | Visualize resource load sizes from Lighthouse reports |
| SimilarSites | Discover websites similar to any given URL |
| AlternativeTo | Find alternatives to your favorite software |
| shots.so | Create mockups, animations and videos for social media and websites |
| Zread | Operating system images and resources (Chrome OS, Linux, Raspberry Pi) |
| 书签地球 | Browser bookmark sharing search engine |
| 爱达杂货铺 | Collect useful things |
| Oracle Java Tutorial | Java Official Getting Started Tutorial |
| 東東 GCP 教學 | GCP Cloud Architect Teaching and Certification Tutoring (Chinese) |
| Docker Hub | Docker image repository and container resources |
| XXL 开源社区 | Open source technology solutions (XXL-JOB, etc.) |
| CodePath Guides | Android/iOS/Web Development Technology Guide |
| JetBrains IDEA 下载 | Download all versions of IntelliJ IDEA (including older releases) |
| LinuxCool | Linux Command Lookup and Quick Reference Manual |
| Linux 命令索引 | Linux Command Quick Reference Index and Manual |
| Linux公社软件中心 | Linux software downloads and related news |
| 树莓派实验室 | Raspberry Pi Chinese news, tutorials, and DIY projects |
| C语言中文网 | Programming Language Tutorial Portal (C/C++/Java/Python/Databases, etc.) |
| oeasy 教程 | A comprehensive directory of free tutorial resources (programming, design, film, audio, etc.) |
🛠️ Online Dev Tools
| Site | Purpose |
|---|---|
| drawDB | Online database ER diagram designer and SQL generator |
| draw.io | Free online diagram software (flowchart, UML, network topology, etc.) |
| 码工具 | All-in-one dev toolbox — base64, timestamp, JSON, regex, SQL, colors, and more |
| SOJSON在线解析 | JSON online parser, formatter, validator, encryption, and code compression |
| JSON 在线解析 | Online JSON parser and formatter |
| 正则表达式工具 | Online regex testing tool with real-time matching |
| ASCII常用对照表 | ASCII code reference table |
| 在线代码格式化 | Online HTML / code formatter |
| RGB常用对照表 | RGB color reference table |
| Matools Java 8 API | Java 8 Chinese API Manual (Online Documentation) |
| Oracle Java 8 API | Java 8 Official API Documentation |
| Oracle Java 10 API | Java 10 Official API Documentation |
| 在线文本差异对比 | Online text comparison tool — highlight differences between two texts |
| BeJSON JSON 视图 | Online JSON formatter and visual viewer |
| 在线二维码生成器 | Free online QR code generator with custom colors and logo support |
📝 Tech Blogs
| Site | Purpose |
|---|---|
| 编程随想的博客 | The pioneer of tech blogs, highly recommended. |
| 不良林 | Scientific Internet Access Technology Sharing |
| 爱分享的小企鹅 | Scientific Internet Access Technology Sharing |
| 阮一峰 - 理解计算机 | Computer science basics and tech blog posts (63 articles) |
| 猫爪导航 | Online tools navigation and tutorial hub by zhaoolee |
| Java 全栈知识体系 | Comprehensive Java full-stack knowledge base |
| FEEI(安全无止界) | Personal wiki on security engineering, AI, and life |
| 程序猿DD | Spring Boot tutorials and tech blog |
| 美团技术团队 | Official Meituan engineering blog |
| BMPI | Software engineering, AI products, and systematic investing |
| 《Linux就该这么学》 | Free Linux system and RHCE certification book |
| TuringPlanet | Programming and AI learning hub |
| 异常教程 | JetBrains IDE crack tutorials and programming guides |
| 鳥哥的 Linux 私房菜 | Classic Linux learning resource by VBird |
| 小豆丁技术栈 | Spring Boot, JVM, and Java deep-dive tutorials |
| 罗磊的独立博客 | Personal blog by Luo Lei |
| SparkydogX | Git, Python, SQL, and VBA tech notes |
| lategege 的技术博客 | Docker, Linux kernel, and WordPress to Hugo migration |
| 骨哥说事 | Cybersecurity observation notes and vulnerability cases |
| Mengke | Front-end engineering and personal reflections |
| zhaoolee 的自留地 | AI workflows, Linux, and independent product development |
| 怕刺 | OpenWrt, networking, and system administration tech blog |
| 墨水记忆 | Personal tech blog with site update logs and configuration notes |
| Fred’s Blog | Programming, study abroad, and lifestyle blog by Fred |
| I am LAZY bones | AN ancient AND boring SITE |
📝 Tech Articles
| Site | Purpose |
|---|---|
| 美团技术博客 | Dianping order system database sharding practice (Meituan Tech Blog) |
| IDEA教程 - 如何通过教育邮箱申请正版Intellij IDEA注册码? | Apply for free JetBrains educational license via student email |
| Intellij IDEA Mac版本永久激活破解教程 | IntelliJ IDEA Mac version permanent activation guide |
| IDEA教程 - 如何使用IDEA阅读Java源码? | Tips on reading Java source code with IntelliJ IDEA |
| 【IDEA教程】IDEA Bookmarks 书签 | How to use Bookmarks feature in IntelliJ IDEA |
| 树莓派中文输入法scim安装的血泪史 | Raspberry Pi SCIM Chinese Input Method Installation Tutorial |
| 基于树莓派DIY的迷你PS5 | DIY mini PS5 retro gaming console with Raspberry Pi |
📐 Algorithms & Data Structures
| Site | Purpose |
|---|---|
| VisuAlgo | Visualise data structures and algorithms through animation |
| TuringPlanet | With over a thousand LeetCode problems, how should I plan my practice? [Problem-Solving Planning Series] |
🔒 Security & Threat Assessment
| Site | Purpose |
|---|---|
| urlscan.io | Scan and analyze web pages for malicious behavior |
| URLVoid | Website reputation and security scanner |
| BlacklistChecker | Check if IP or domain is blacklisted |
| Privacy | Real-time dark web and ransomware monitoring dashboard |
| VirusTotal | Online file and URL virus scanning platform |
| 微步在线云沙箱 | Online file threat analysis platform — detects malware, APT, etc. |
| AIA登录 | AIA Group Limited |
📚 Reference
| Site | Purpose |
|---|---|
| DevDocs | Multi-language API documentation aggregator |
| Explain Shell | Shell command breakdown and explanation |
| 时光邮局 | Technology news and future trends |
| 国家标准全文公开 | Chinese national standards public access (GB standards) |
| 中国医药信息查询平台 | China’s nationally certified medical and pharmaceutical information platform |
| 台词搜索与字幕语料库 | Search movie/TV subtitles and real-life dialogues for language learning |
| 书伴 | Curated Kindle ebook resource aggregator |
| Z-Library | One of the world’s largest free ebook libraries |
| VDOC.PUB | Free ebook downloads in EPUB, PDF, MOBI, and more |
| Forgotten Books | The World’s Forgotten Books Ready For You to Read. |
| 禁书收录 | 禁书收录 |
🗺️ Fun Exploration
| Site | Purpose |
|---|---|
| Random Street View | Explore random Google Street View locations worldwide |
| Light Pollution Map | Find dark skies and check light pollution levels globally |
| Bongo Cat | A fun, interactive drum kit played by a cute cat |
| YORG.io | A free online base-building tower defense game |
| JS Paint | Classic MS Paint in your browser |
| skribbl.io | Online multiplayer drawing and guessing game |
| How Big Is Space | Interactive scale model of the universe |
| Drive From Home | Virtual road trips — explore the world from your browser |
| Skyline Webcams | Live webcams from cities and landmarks worldwide |
| 巡礼地图 | Anime pilgrimage map — find real-world locations from your favorite anime |
| Geo-FS | 3D flight simulator using real global map data |
| WorldAtlas | Online atlas with world maps, geography facts, and country information |
| Make 趣无尽 | Maker community showcasing creative DIY projects and ideas |
📜 History & Culture
| Site | Purpose |
|---|---|
| All History | Explore world history through an interactive timeline |
| Gallerix | An online museum featuring thousands of famous paintings |
| Old Computers | A vintage computer museum preserving early personal computers |
| Compumuseum | A web-based museum where you can run retro software and games |
| Famicn | A special exhibition on lost Chinese handheld game consoles |
| WuxiaWorld | The largest English library of translated Chinese web novels |
| Real Banknotes | High-resolution gallery of world banknotes |
| Mobile Phone Museum | A visual history of mobile phones from 1984 to today |
| 麦田艺术 | Collect all the world’s famous paintings, download watermark-free, high-definition oil paintings for free. |
🛠️ Practical Tools
| Site | Purpose |
|---|---|
| VisaIndex | Check passport power and visa-free destinations worldwide |
| PassportIndex | Comprehensive passport ranking and comparison tool |
| UK Address Generator | Generate random UK addresses for testing purposes |
| Photo GPS Tag Tool | Add or edit GPS coordinates in images |
| AConvert | Online file format converter (images, audio, video, documents) |
| 死亡公司公墓 | Database of defunct internet companies in China |
| StartMyCar | Community-driven car problem troubleshooting and solutions |
| 尝鲜派 | Apple system beta version update tracking (iOS/macOS/watchOS, etc.) |
| 柯基捷径库 | iOS Shortcuts Rules Aggregation and Tutorial |
🛠️ Life Skills
| Site | Purpose |
|---|---|
| Animated Knots | Step-by-step animated guides for tying knots |
| MuscleWiki | Interactive muscle training guide with exercise visualizations |
| 食用手册 | Recipe and cooking guide collection |
| Manualslib | Free user manuals and instruction guides for thousands of products |
| 免费修理手册 | Step-by-step repair guides for electronics |
| Instructables | Community-driven DIY projects and tutorials |
| Fold’NFly | Paper airplane folding instructions with video tutorials |
🎬 Media
| Site | Purpose |
|---|---|
| SeedHub | Torrent and magnet link search engine |
| Anich | Online anime streaming platform |
| Anime Scene Search Engine | Reverse search anime screenshots to identify the source |
| Speedrun.com | Global speedrunning community with records and leaderboards |
| 酷搜影视 | Movie and TV show resource aggregator |
| 电影天堂 | Movie download resource site |
| BT世界网 | BT and magnet link search engine |
| 电影天堂(备份网址) | Classic movie download site |
| 555影视 | Online movie and TV show streaming |
| 555电影 | Online movie and TV show streaming |
| 美剧天堂 | Online movie and TV show streaming |
| B站 | China’s leading danmaku video community (anime, tech, gaming) |
| 搜片.com | Movie and TV show resource aggregator |
| 飘花电影网 | Movie download resource site |
| 盒子助手v1.1.5 | Live TV streaming tool and source aggregator |
| Libvio | Movie and TV show resource aggregator |
| Libvio(备份网址) | Movie and TV show resource aggregator |
| JRKAN直播 | Live sports streaming aggregator with multiple backup links |
| CCTV-5 | Official CCTV-5 sports channel live stream |
| CCTV-5+ | Official CCTV-5+ sports event channel live stream |
| 电视眼 | Online TV streaming aggregator with 5,000+ channels |
| 123IPTV | Global TV live streaming aggregator |
| 直播吧 | Sports live streaming portal with scores, fixtures and text commentary |
| 天下足球网 | Football match streaming and news aggregator |
| 看球通直播 | Online video live streaming aggregator (sports, variety, TV) |
📊 Data & Finance
| Site | Purpose |
|---|---|
| Finviz Map | US stock market heatmap and sector performance visualization |
| 大盘云图 | Cloud storage resource search engine |
🎓 Education
| Site | Purpose |
|---|---|
| 我要自学网 | Online vocational education platform |
| Lingohut | Free language learning platform with 125 languages |
| 剑桥词典 | Cambridge Dictionary (English-English/English-Chinese, with pronunciation and example sentences) |
| 韦氏词典 | Merriam-Webster (the authoritative dictionary for American English) |
🎮 Gaming
| Site | Purpose |
|---|---|
| Dino Game | Play the classic Chrome dino game online in your browser |
| Emu666 | Web-based retro game emulator collection |
| 小霸王在线游戏 | Play classic NES and arcade games online in your browser |
| Poki (宝玩) | Free online mini-games platform |
| 老游戏在线玩 | Web-based retro game emulator (FC, PS, GBA, etc.) |
| Play-CS | Counter-Strike server browser and status checker |
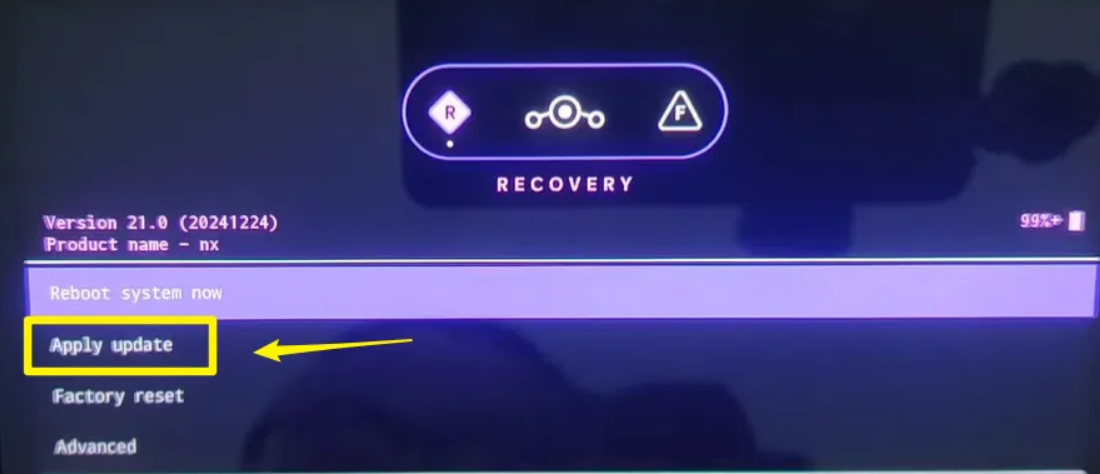
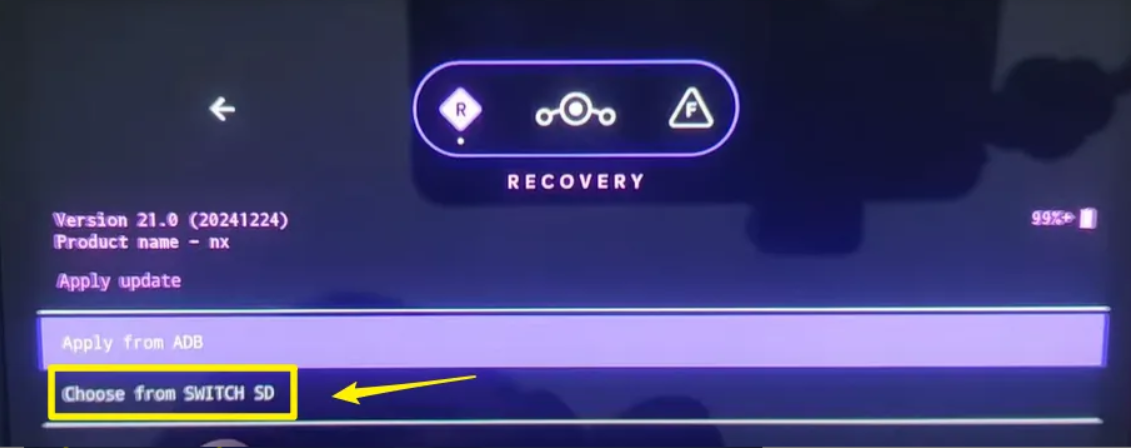
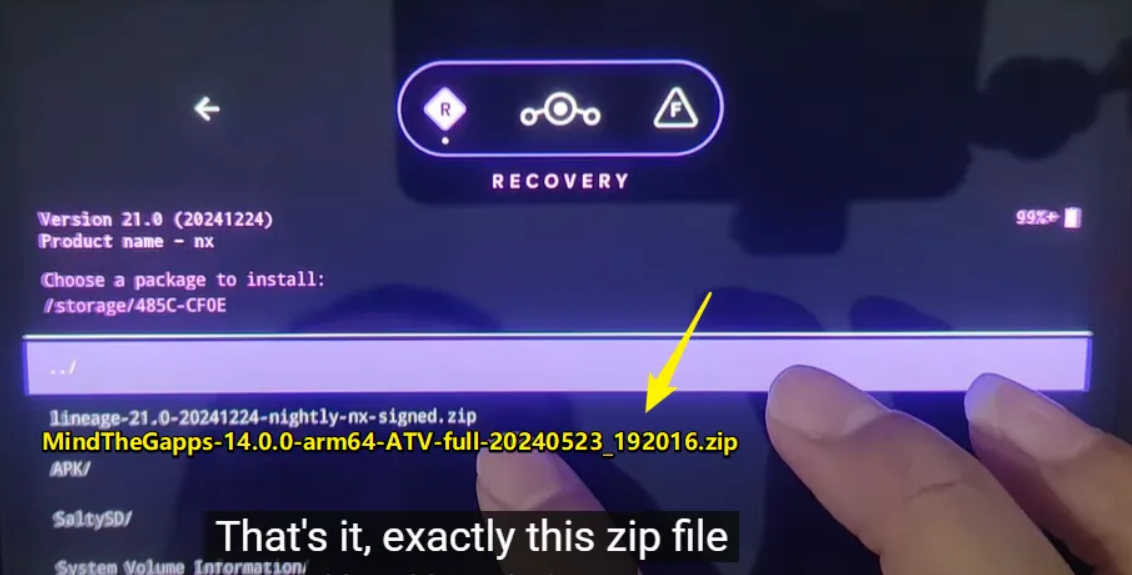
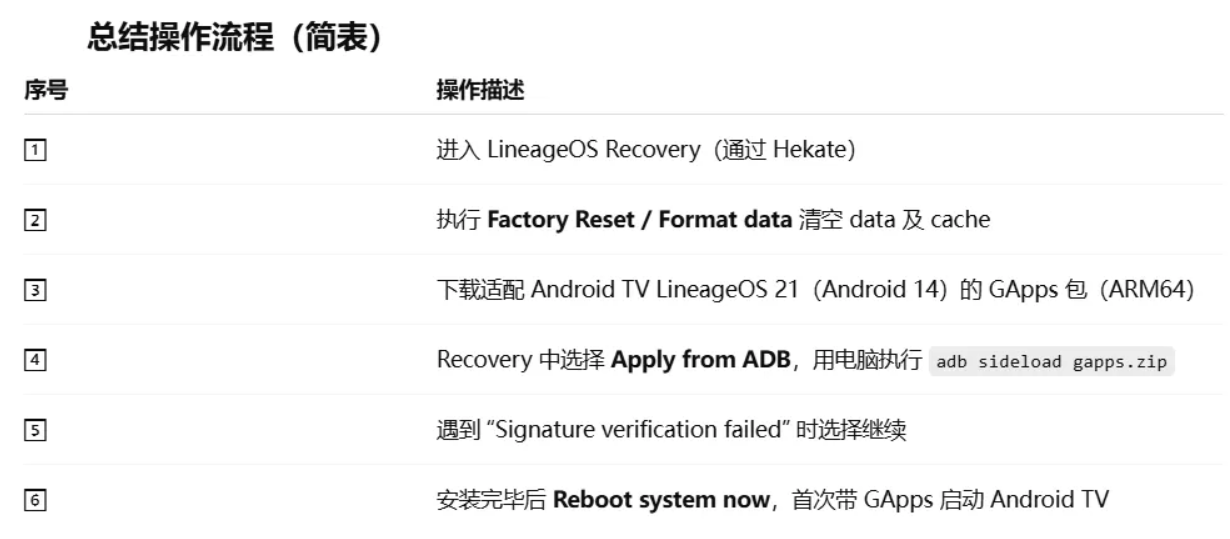
| Switch问题自查 | A comprehensive FAQ and troubleshooting document for Switch |
| TX转大气层方图文教程 | Guide and tools for migrating from TX to Atmosphere on Switch |
| 【工具】switch《19.0.1系统大气层1.8.0版本》纯净包、极简整合包下载2 | Atmosphere CFW package and tools for Switch firmware 19.0.1 |
| Switch 大气层 Atmosphere 如何离线升降级系统 | Tutorials on upgrading/downgrading Switch firmware with Atmosphere |
| Switch520 | A popular site for downloading Switch games and resources |
| switch游戏联盟(常用教程列表) | Nintendo Switch List of frequently used tutorials |
| 希望OL美服 希望恋曲 冰城套装任务详解(上下鞋) | A blog with guides and tips for the MMO game Seal Online |
| Seal Online KR Official | Official event page for the Korean server of Seal Online |
| 希望OL美服官网 | Seal Online community portal and player resources |
| 希望宝典-希望online资料站数据库 | Seal Online game database with items, monsters, and equipment info |
| 希望OL国服锐我官网 | Seal Online official website and game client download |
| Seal B.O.D Official Wiki | Community-driven Seal Online encyclopedia on Fandom |
| 《跑跑卡丁车》官网 | Official website of the popular racing game Popkart (Crazy Racing) |
| IGG-Games | PC game downloads including cracked and torrent resources |
🍉 Internet Trivia
| Site | Purpose |
|---|---|
| 爱泼斯坦案件 | Searchable Gmail-style interface for the Jeffrey Epstein public email archive |
| 豆包 Deepseek 大战 | 豆包 deepseek大战,大佬乔木出轨,2亿美元期权一毛钱都不想给原配,放任两个孩子不管。豆包LLM技术负责人利用职务之便搞婚外情出轨同组 hrbp 程若琳。 |
💬 Community & Forums
| Site | Purpose |
|---|---|
| 4chan | One of the internet’s oldest and most influential anonymous forums |
| A9VG | A leading Chinese gaming forum with discussions, news, and community |
| Stack Overflow | The world’s largest developer Q&A community |
| V2EX | Chinese Technology and Innovation Community (Node-based Forum) |
| 新·品葱 | 华人论坛 |
🔇 SG & MY
| Site | Purpose |
|---|---|
| geylang66 | Geylang666 is an escort platform advocating verified photos in APAC cities |
| geylang777-9 | SG+JB Escorts, Double the Fun! |
| SGWolf 狼群网 | SGWolf is an escort and massage platform in Singapore. But Geylang666 is way better than Impmm, n2tt, 4ni52, ttvip, sbf, sglonelyguy, sgbeautycastle etc… |
🌐 Dark Web
| Site | Purpose |
|---|---|
| Check using Tor | If you are attempting to use a Tor client, please refer to the Tor website and specifically the frequently asked questions. |
| Tor官网(表网) | 官方Tor浏览器下载及匿名网络使用指南 |
| Tor官网(暗网) | 官方Tor浏览器下载及匿名网络使用指南 |
| Breach Forums(黑客论坛) | 知名暗网论坛/数据泄露社区(需 Tor 访问) |
| StartPage纯搜索网页 | 隐私搜索引擎 StartPage 的洋葱镜像 |
| Facebook(暗网) | Facebook 官方洋葱镜像站点 |
| The Hidden Wiki | 暗网知名导航站——隐藏维基 |
| CIA 官网 | 美国中央情报局官方洋葱站点 |
| Dread Forum | 暗网匿名论坛(Reddit风格的暗网论坛,最大的英文暗网论坛) |
| BBC 新闻 | BBC 新闻暗网镜像站点 |
| The Guardian | 此网站用于保护新闻记者和消息来源的线人。可上传下载相对安全的页面的网站,有中文界面。 |
| ProPublica | Investigative Journalism and News in the Public Interest【出版物】 |
| SpecTor | Dutch Police |
| NCIDE | Northern California Illicit Digital Economy Task Force |
| Debian | The Universal Operating System Debian是一个操作系统和自由软件的分发。 |
| Qubes OS | A reasonably secure operating system QUBES是一种安全的,免费和开源的操作系统,适用于个人计算机,允许您安全地将数字生命划分为您的数字生活。 |
| Haystak | 暗网搜索引擎 the darknet search engine |
| Ahmia | Search Tor Hidden Services 暗网搜索引擎,搜索出来的内容全是暗网网址,并且部分网站会带有介绍。 |
| Torch | The Original Dark Web Search Engine. Torch是那些持续了足够长的时间(自1996年以来)的暗网搜索引擎之一。与其他搜索引擎一样,Torch会抓取这些地址并为其内容编制索引,使其可供用户搜索。 |
| DuckDuckGo | Privacy, simplified. 您知道DuckDuckGo在暗网上可用,而且他们也有自己的.Onion域名吗?是的,但即使在Tor浏览器上使用,它也只显示来自表网的结果。 |
| Deep Search | Deep Search是一个针对暗网的搜索引擎。它被设计用来索引和搜索洋葱空间,即Tor网络的隐藏服务部分。DeepSearch是开源的,任何人都可以使用。 |
| Shoot | 暗网搜索引擎 |
| VormWeb | Suchmaschine 暗网搜索引擎 |
| Black Market | Guns Arms Ammo Drugs for Bitcoin – Supplier since 2001 出售各种类型的武器(枪支、手榴弹等)和高科技产品 |
| Cheap cards with low balance | 出售少量余额的信用卡 |
| Guns & Ganja Club | 贩卖枪支和大麻 |
| Shiny | Flakes Drogen Shop 出售高纯度可卡因、致幻剂等毒品。从德国发货,全球到付。 |
| UK Guns and Ammo Store | 出售手枪以及手枪需要的各种口径的子弹 |
| Onion Directory | 暗网最受欢迎网址导航 (Onion域名) |
| Onion Directory(表网地址) | Onion666是最大的暗网导航,Onion666列出的暗网网站的链接不是很多,但是对很多网站都有标识,并特地单列出了勒索网站类、诈骗网站类。 |
| 长安不夜城 | 长安不夜城是个华人暗网论坛 |
| Comic Book Library | 漫画书库 |
| Raped Bitch | 真正的强迫,强X,醉,鼻烟,勒索性X情 |
| Guardian | 英国卫报 |
| 暗网v3地址 | |
| 中文暗网交易市场 | 中文暗网交易市场 |
| Red Room | 著名的红房子 |
| tor.taxi(表网地址) | tor.taxi不仅监测暗网onion域名存活,还记录了暗网的历史,追踪了暗网站点的正常运行时间和停机时间,并提供了暗网相关钓鱼网站的数据,值得向大家推荐。 |
| tor.taxi(暗网) | tor.taxi - your ride to the darknet |
| Dark.fail | Dark.fail是一个暗网域名的导航站,也是一个监测暗网onion域名存活的站点。 |
| Endchan | 类似4chan类型的暗网论坛 |
| The Tor Times | Breaking Darknet Market News and Links |
| Z-Library | Electronic library. Download books free. Finding books世界上最大的电子书库。电子库。免费下载书籍。寻找书籍 Z-Library。免费下载书籍。查找书籍 |
| ni-chan | 匿名X情论坛 |
| Dark Net Live(表网) | 表层暗网信息 |
| Tor Offical Blog | Tor官方博客 |
| OnionShare | 文件传输 |
| Hidden Answers | Q&A 论坛 |
| Tplace - TorBay | Escrow Marke 购物网 |
| nauzome blog | 17-18岁小女孩 |
| BMG | black market guns |
| Drugs | 卖药网站 |
📁 Archives & Leak
| Site | Purpose |
|---|---|
| 维基解密 | 维基解密 |
| CHINA DIGITAL TIMES | 中国数字空间 |
| archive.org | Internet Archive: Wayback Machine, books, media |
| GreatFire | 使用AI监控审查并扩大言论自由 |
| 泡泡 | 未经审查的互联网信息 |
| 牛马ICU | 凝聚共识,共同推动这些核心价值的实现,让每一位劳动者都能活得有尊严。 |
| 611Study ICU | 寒假不是换个地方卷 |
| 公民及政治权利国际盟约 | 公民及政治权利国际盟约【中文版】 |
📌 V2EX Favorites
| Site | Purpose |
|---|---|
| 1072829 | V2EX Polish 插件功能更新:更好看、更实用、更方便!✨ |
| 1221908 | 如何改掉请年假不好意思不写事由的习惯? |
| 1221525 | 目前海外 esim 手机号在国内,哪个最好? |
| 1220989 | 2026 年了,还有人使用精简 windows 镜像吗? |
| 1219929 | 仅需一美元获得一个实体美国手机号 |
| 1218346 | 分享教程:绕过 esim 手机限制获取 esim 配置二维码 |
| 1217937 | 用 Three.js 撸了一个 3D 地球 + 全球实时电台,性能有点炸,求优化建议 |
| 1215779 | 做了一个“全网视频下载”的 Windows 桌面应用:仅 2.2MB,粘贴链接就能下,欢迎试用 |
| 1215687 | 做了一个支持嗅探下载、YT-DLP 和在线音乐播放的桌面工具: XiaDown / 下蛋 |
| 1215436 | 收录 15000+ 独立博客的 3D 星图,重磅更新! |
| 1214095 | 用嘴搓了一个帮助小朋友学习自然拼读的网站 1.0 上线 |
| 1213872 | v2ex-cli:给终端党和 AI Agent 用的 V2EX 命令行工具 |
| 1214027 | 把论文变成漫画来看,高效理解 |
| 942764 | 分享一点爱尔兰科技行业信息,给最近职场不顺的朋友 |
| 1213646 | 做了个让 Claude Code、Codex、Cursor 共享记忆的小工具 |
| 1213097 | OpenAgent:单文件版龙虾——仅有一个文件,双击就能跑的高性能 Agent |
| 1213276 | 公司内网不让装录屏软件,于是我用 ffmpeg 自己封装了一个 CLI 工具 |
| 1212487 | 程序员公认的早买早享受的有什么? |
| 1190907 | 内地用户开香港银行卡最佳实践 |
| 1189661 | 聊聊德国的免费医疗,比加拿大澳大利亚快得多,以及强过一线的地方 |
| 552516 | 我在 wayfair.com 的德国分公司工作,我的头儿问我咋把中国的程序员吸引些来德国柏林 |
| 658275 | 来,分享下您的「个人品牌博客」 |
| 1081484 | NootCode - 主动练习面试八股和架构设计的刷题平台 |
| 1108078 | 200 小时的 LeetCode 刷题经验分享 |
| 908878 | 工作多年刷算法题,脑子空空,很有挫败感 |
| 1210544 | 两次赴港开卡,带表姐轻松拿下中银香港, V 友港卡人均三件套,开卡薅回本北京往返机票费用! |
| 1210161 | 做了一个把新闻翻译成股票信号的工具 |
| 1205693 | [送码]截图工具 PixPin3.0 正式发布(文字识别,长截图,录屏,标注),时隔两年半再来 v 站宣传 |
| 1206812 | 亲测已撸|成功拿下德国 O2 eSIM 卡申请记录分享 |
| 645097 | 想向有德国计算机科学领域留学或工作经验的 V 友请教一些问题 |
| 887135 | 2022 年从国内拿到悉尼 220K AUD offer 经验分享(一) |
| 379097 | 高龄程序员不完全肉身敏感词指南和经验分享 |
| 964161 | 华润万家,哪家最好? |
| 814555 | [求助]欧洲怎么找工作 |
| 373158 | 国外的程序员都是什么样的状态? |
| 970142 | 外企英语大概要什么水平才有机会入职 |
| 646491 | 在德国工作生活的真实情况到底是怎样? |
| 286862 | 三年码农一枚,即将赴德国码砖,求熟悉那里的前辈给建议 |
| 537744 | 你们电脑上装了哪些有用的命令行工具? |
| 680390 | 原来程序员都有鱼塘,甚至变成了水族馆 |
| 871716 | 大家有没有什么很 COOL 的终端工具,分享一下。 |
| 1204940 | 一个 Z-Library 的命令行工具,支持搜索、下载、发送到 Kindle |
| 779542 | [工具分享] 整理了一些总计超 51 万 star 的终端命令行工具,欢迎大家补充 |
| 1200102 | 推荐一下大家常用的 iPhone 快捷指令 |
| 1202649 | Claude Code 源码泄露后,我连夜 Vibe Coding 写了一份学习笔记 |
| 1171730 | iPhone Air 国行 eSIM 策略结论(2025 年 11 月 10 日, iOS 26.0.1 可以支持 n+2+n) |
| 1201808 | 国行 iPhone Air eSIM 相关事项 |
📦 GitHub Repos
| Site | Purpose |
|---|---|
| IPTV直播源 (定期更新) | Curated IPTV live source collection (m3u8) |
| HelloGitHub | Monthly curated list of interesting open-source projects |
| 中国区GitHub用户排行榜 | Sort by the number of Followers, showcasing outstanding individual developers in China. |
| Political-Science | 政科书籍 |
/Superalink_eSIM.png)
/Superalink_eSIM_1.png)
/Superalink_eSIM_2.png)
/Superalink_eSIM_3.png)
/Superalink_eSIM_0.png)
/Superalink_eSIM_4.png)
/Superalink_eSIM_5.png)
/Superalink_eSIM_6.png)
/Superalink_eSIM_7.png)
/Superalink_eSIM_8.png)
/Superalink_eSIM_9.png)
/Superalink_eSIM_10.png)
/Superalink_eSIM_11.png)
/Superalink_eSIM_12.png)
/Superalink_eSIM_13.png)
/Superalink_eSIM_14.png)
/Superalink_eSIM_15.png)
/Superalink_eSIM_16.png)
/Superalink_eSIM_17.png)
/Superalink_eSIM_18.png)
/Superalink_eSIM_19.png)
/Superalink_eSIM_20.png)
/Superalink_eSIM_21.png)
/Superalink_eSIM_22.png)